One of the most common questions we get asked is, "How do I carry my baby on my back?"

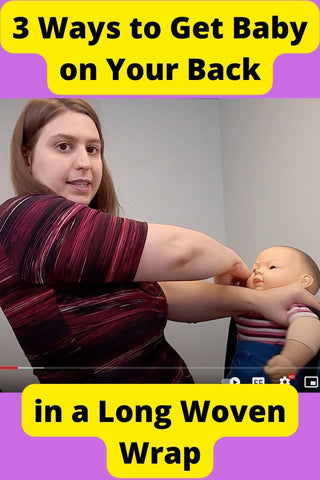
Mama & Roo's Founder Alexandra demonstrates a crossed arm method to get baby on your back in a long woven wrap in this screenshot.
We get it! It's a pain to have baby in front of you while you're trying to get things done. Those cute little bodies can really get in the way sometimes! Plus, babies who are starting to learn about the world love seeing things from your perspective (and sneaking a cuddle in along the way!).
In this article, we'll walk you through:
- How to know when you and your baby are ready for back carries
- What makes a carrier safe to back carry in
- 3 ways to get baby up onto your back in a woven wrap--these methods are used for any other back carries you need, so it's essential you find and master the technique that works for you
You'll be a pro in no time, so let's get started! Watch here, or read instructions below the video.
Safety:
You and your baby are ready for back wearing when:
- Your little one can tripod sit/sit unassisted. In a normally developing child this is typically around 4-6 months. For a special needs child you may adapt this based on your child's specific needs and your confidence in maintaining safe positioning and an open airway
- You are confident in your wrapping abilities to make a seat and tighten your wrap in front carries
- A helpful tip: if you're naturally putting your baby on your hip, your baby has the core strength for hip and back carries
Other tips:
- Fabrics should be woven, not stretchy, for safe back carrying. Stretchy wraps allow for too much slack for safe back carrying
- Newborns can be back carried in a wrap by those who are very experienced in wrapping and who can get an accurately positioned and tightened seat every time. Newborns are particularly at risk of positional asphyxiation, so we do not recommend back carrying newborns as a general rule. Newborns also need to be up and down frequently for feeding, diaper changes, and spit up, so it's typically more convenient to have them on your front anyway =)
- Practice over a soft surface with a spotter (if possible). You can practice with a weighted doll or another object until you're comfortable with the method
- These methods are being shown with a woven wrap, but these basic concepts can be used to get any style carrier on your back
Method 1: Crossed arms
- Cross the arm of the shoulder you will bring baby over underneath the other arm. Use your hands to pin the top rail of the wrap to your child in the position you want the wrap to be in when baby is up. So, if you want baby arms in, position the top rail and hold onto it at the top of baby's shoulder. For arms out with an older child, grab your child under the arms with the wrap
- Move your body into your baby (as opposed to twisting your baby to you). This will allow you to get baby up into the wrap without twisting the wrap
Once baby is up:
- Hold tightly to the top rail, pinning it with your chin or biting it with your teeth. This takes practice! The top rail is what holds your baby up. Continue to practice up until this point until you completely trust that the wrap will hold your baby with this top rail
- When you're confident in the previous step, continue these instructions to make a seat. This is a common start for the Ruck carry
- Pull the slack down with the bottom rail. Pulling it out can help! Stand up straight and allow gravity to help you.
- Tuck the bottom rail under your baby, tilting their pelvis into position
- Bring the tails of the wrap up over your shoulders, keeping tension on the tails and top rails especially
- Tighten as needed and begin your chosen carry!
Method 2: Hip Scoot
- Position baby on your hip
- Positioning the middle marker of the wrap (or off center mark, depending on the carry chosen) on your baby, make a seat.
- Take one tail behind you, across your back, and over the opposite shoulder with the tail hanging over the front
- Take the foremost tail (the other tail) across your chest to meet the tail from behind
- Position your child in the wrap with a proper knee to knee seat and the wrap tucked up in proper position
- When you're satisfied with baby's seat, use one hand to tightly hold the 2 tails together where they meet at the opposite shoulder from where baby is
- Using the other hand to support baby, scoot baby onto your back. Use the tails of the wrap to help you position baby into place on your back
- Tighten and begin your carry, making sure to keep tension on the top rail/tails
Method 3: Santa Toss
Typically best for tiny babies, please be aware of all safety concerns prior to starting
- Lay your child on the wrap at the middle marker (or the place you need the wrap to start for an off-center carry
- Carefully position the top rail at your child's neck for support
- Position the bottom rail under your little one's knees
- Tightly gather the wrap up, making a little "bag" for your baby
- Using one hand to tightly hold the sack holding your baby, use the other hand to support your baby. Putting both tails to one (the same) side, carefully lift your baby to your back. You want to put baby cheek to cheek with you
- Once baby is up and cheek to cheek with you, carefully move one of the tails over to the other side of your head
- Adjust your baby's position and seat using the tails, keeping adequate tightness on the top rail
- If you lost the seat on the way up, follow the "once baby is up" section in Method 1 above
You're ready to back wrap! Once you get the hang of it you'll wonder how you ever wrapped without this great technique =).
Look out for more tutorials of specific carries! Right now check out a fun summer torso back carry video by tapping here.
If you're ready for a wrap of your own to enjoy every moment with your baby (even if it's just a trip to the store!), check out Mama & Roo's selection of ethically made, vegan baby carriers and wraps below.