I *love* a carry that lets you go about your day and sit in a CHAIR. lol! I don't know about you, but knots on my back while wrapping are just not comfortable when sitting for me, whether it's at the table, in the car, at church, wherever. I would move my knots around with longer wraps when I could to avoid it.
But this carry was made for just those situations - and, it's even better, because it's super easy to pop baby in and out of the carry. So if you've been wearing baby and now you need to go on an errand, just take baby out, leave the carry tied, drive to the store and then pop baby in once you're inside.
Another great advantage of a "poppable" carry like this in a shortie wrap (typically base -2 or base -3) is that you can use it in a parking lot or public place and you don't have to worry about tails dragging on the ground!
You'll love using this easy-to-learn carry from the newborn days as a front carry through the toddler years with your little one as a hip carry. Enjoy!
P.S. Like written instructions? See below the video here!
How to tie a Robin's Hip Carry (size 4/base -2 wrap)
This carry can be used as a front carry (great for newborns) or a hip carry for older babies. Simple to learn and adjust. Can be used with shortie wraps (base -2 / -3) or a longer wrap with longer tails. A "poppable" carry, which means baby can easily go in and out all day long without having to re-tie the carrier. No knot on the back means you can pre-tie the wrap in this carry and then safely and comfortably drive to your errands - no dragging tails in the rain/snow/grocery aisles! You start this carry at the middle marker, making it even easier to look good!
How to tie Robin's Hip Carry:
Start with the middle marker at the back of your neck and let the wrap fall over your shoulders, one tail on each side. Decide which hip baby will be on. Whichever hip you want baby to sit on, bring that tail under that arm.
Create a "hinge" on the opposite shoulder: Bring the tail that was under your arm across the front of your body, overtop the tail opposite of the side baby will be on. Flip the tail of that opposite shoulder backwards over the cross pass. Make sure things are not twisted. Bring the flipped back tail across your back and around to the front and pin it between your knees. Keeping this tight will help as you adjust baby securely in the seat.
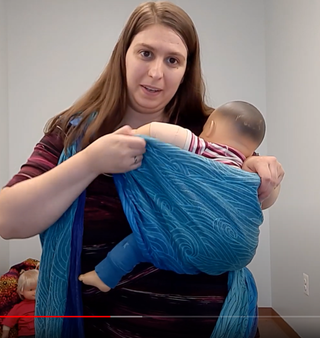
Make a seat: You now have a sling of fabric to the front/side of you. Bring baby to your shoulder and lower them onto the sling. Adjust the fabric from knee to knee and then bring the top rail up.
Tighten and knot: Move the slack out of the seat and into the dangling tail (not the one pinned from behind you.) When you've pulled all the slack out and you feel good about the seat placement, bring the dangling tail and the tail you pinned behind you together in a half knot under baby's bottom, then finish with an additional knot. Baby is secure!
To take baby out: Raise the seat up, move the top rail down baby's body and lift baby out.
To put baby back in the tied carrier: Lift baby to your shoulder. Lower them into the carry, seated on the seat and knot. Adjust the fabric from knee to knee and lift the top rail up. Move any slack into the knot -no need to re-tie for just a little slack!
If you want a wrap of your own to enjoy every moment with your baby- whether you're on a hike, doing chores, at a festival, or just a trip to Target! -- check out Mama & Roo's selection of ethically made, vegan baby wraps here:
https://mama-roo.com/collections/long-woven-wraps
See our latest wraps below