Summer is on its way, and with it lots of creative ways to stay cool!
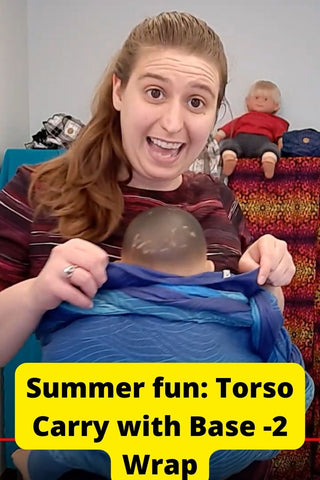
Watch below to learn the Front Torso Carry with variations, including Pond Finish, so you can enjoy wrapping your baby no matter what the weather brings you. We'll use a base -2 in today's video, which is a great size for all kinds of wrapping fun!
Text description below video.
Learn how to do a front torso carry in a base -2 long woven wrap, including variations like Pond Finish (to be extra fancy!)
You can do this carry in a variety of sizes and lengths to suit your needs, but what I like about it in the base -2 is that it's just enough that we can do a regular tie off or we can do something a little fun!
This video will show you a few variations of that, including a Pond finish and with extra support for newborns.
The best thing about the torso carry is that it's really nice for summer and for caregivers and children that “run hot”!
Removing the arm straps makes the wrap instantly that much cooler! But, if you find you want to switch it up or need more support, it’s easy to convert this carry into a one-shoulder or two-shoulder carry as well.
Can a woven wrap with no arm straps really be supportive? Yes, it can! And if you don’t believe me, definitely make sure you try it out for yourself. You’ll love it! For this carry specifically, I’d recommend something a little thicker with a bit of texture to it. Especially with a shorter length wrap, you will really appreciate not just the coolness of the carry, but how secure it feels with the bit of extra grip. Something like our Jacquard lines, especially our linen (the best for heat!) would work perfectly.
To do a front torso carry (great for any age child!):
-
Start the same way as a front wrap cross carry (See video here if you’ve never wrapped before—this is our recommended first wrap carry)
-
Find the middle marker and center it on your chest. Imagine baby’s head up above the wrap—you want baby to be close enough to comfortably bend down and kiss without overextending
-
Take one tail (side of wrap / end of wrap on one side) under your arm and diagonally across your back, coming up and over the opposite shoulder. Tuck the tail between your legs or under your arms to hold it in place
-
Repeat with the other tail. You should now have a cross of fabric on your back
-
Tighten rail by rail so that you have just enough of a pouch for baby to go in. Hold tails as needed to hold tension
-
Place baby into the pouch. Gather the waist pass into a bunch to make it easier. Bring baby to your shoulder in “burp position,” then use one arm to reach under the bunched pass to pull baby’s feet through. For help with the seat, you can “settle” baby onto the bunch pass (if you have enough fabric in the tails that you are able to hold sufficient tension against this. Pull the top rail up to the desired height—no higher than the bottom of the earlobe and no lower than the armpit. Arms-in is likely easier to start with this carry, but so long as you tighten appropriately and maintain a solid seat, arms-out is also acceptable
-
Adjust the seat as needed. Bring the bottom rail between you, up to about the diaper line. Make sure the child’s legs are not over-extended. The wrap should support the child’s legs from knee to knee and allow the legs to swing freely
-
Tighten the wrap. Remove slack by tightening rail by rail. Hold tension in the tail you aren’t working on by tucking between your knees. If the wrap isn’t long enough to do that, tuck it under your arm or pin under your chin or with your teeth
- When tightening pull up diagonally to get the best pull to remove slack
- One at a time, move the tails under your arms and tighten rail by rail horizontally
- Depending on the length of your wrap and your baby, you can decide how to finish from here! Options include—bringing the tails fully spread around the child, adding layers to the torso pass. You can tie in the middle of your child’s back. You can tie under your child’s bottom
-
Other options for a shorter wrap—you can twist, for looks or for extra head support, and tuck the edges of the wrap in
- You can also do a Pond Finish—twist one tail across to the side of your baby. Tie a half knot with the other tail. Then twist the 2 tails together going down to the bottom of the wrap. Depending how long your wrap is, you can bring the tails around to tie, or you can simply tuck the ends into the wrap
This is a really fun carry with so many variations! I think you’re going to love trying this carry this summer, and if you’re curious about a base -2 wrap, there’s no better time to try than now!
Mama & Roo’s has a variety of size 4 (base -2 for those whose base is a size 6) and size 5 (base -2 for those whose base size is a size 7) wraps in stock perfect for this carry and many others. Check out our ethically made, certified safe long woven wraps below!